Moving on up

April 14th, 2008

This weekend we loaded up the absurd mass of stuff that has been sitting in storage, gathering dust, and moved into the Brick House!

Thankfully the school had a relocation budget, so we hired the good folks at Bekins to help lug our stuff to the house. What a glorious thing to have movers. It makes the whole process so much more fun and easy, well except for deciding were things should go,

The bathroom floors were finished being installed and Sunshine Janitorial is coming Wednesday to scuff them up and make them shiny. For $200 I approve of the professionals doing it right, and getting the paint splatters out of the kitchen.

Everything is a mess, we have a new old stove, and our dog is freaking out. A few more weeks and it might be inhabitable.

VCT Floors

April 7th, 2008


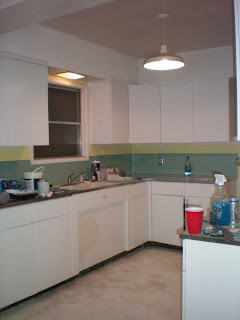
Although the project is still not quite complete, the new black
VCT floors are going in and looking fabulous. We decided on the Armstrong 12 in. x 12 in Classic Black Imperial Texture – classic indeed.

The process of getting the kitchen floors ready for installation is what took the most time, labor, tears, and cash. We scraped up 4 layers of vinyl and linoleium and we ripped out the damaged plywood areas – one water damaged spot under the fridge and a termite damaged spot near the shower stall.


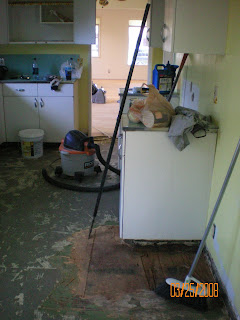
(shower stall termite damage – EWWWWW and the water damage in the kitchen)

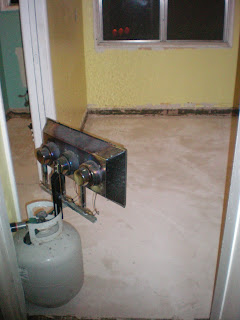
The termite damage extended beyond that small section and eventually half of the bathroom floor was gone, revealing the sub floor underneath. The holes were patched with 3/4 inch plywood and screwed down to the sub floor and then the entire floor was filled with a gypsum based floor patch and leveler.


(Crazy Dave – the tile expert extraordinaire who made it all happen! A talented and mentally unstable fellow as well as a good friend)


(this is the gypsum covered and troweled floors – smooth as plaster and ready for VCT)

Crazy Dave went way overkill and did about 4 layers of floor leveler and hand troweled it level and baby butt smooth. It was amazing and something I don’t recommend anyone attempt as a DIY.

Once the floor patch was dry and level- putting in the actual VCT tiles was a snap. Lay down the VCT adhesive and after it is troweled and left to dry for an hour (so that you can touch it without it being sticky), lay in your tiles and walk on them immediately. It went very quickly, in a few hours we had a brand new floor in our kitchen and back bathroom with a total cost of about $350.

I couldn’t be happier. We still have to buff and wax the whole thing and install the left over tiles in our pink bathroom, but for a weekend project it turned out quite successful. I love VCT!

Refinishing the Hardwood pt. 2

March 31st, 2008

I called in the experts – the Hardwood Experts.

It was insane to think I could do the floors myself after checking out the equipment and reading up on the process. My hands were so bruised from scrapping the kitchen floor that it seemed impossible to sand down the 1000 sq. ft of white oak flooring in the house. I have never made a better decision. Three guys came out and sanded and sealed the floors for $1.70 a sq ft. Plus, they patched in a damaged board and filled the dings in for free. They were courteous, helpful, on time, and very professional. They also did the whole thing in 2 days!


(look how dark the floors were stained!)


(This is right after they started sanding and throwing down some patches)


(They had to sand the white paint off the floors in each bedroom. The poor plaster wall, it came off the cement bricks about 4 inches – so we had to tear it down, and we will rebuild.)


(bags of sawdust from the sanding)

It turned out beautiful – and if anything goes wrong with the urethane in the next year they will come out and fix it for free.

Final results: